
Quick-Start Setup Guide - Marketing & Creative Agencies
This guide will get your agency reporting on billable hours in under 10 minutes. We’ve pre-selected the field setup that works best for marketing and creative teams — so you can start tracking client time, campaign hours, and billability without building a system from scratch.
What You’ll Have at the End of This Guide
Time Reports Pro add-on installed and connected to your agency’s Google Calendar
Custom Fields set up to track clients, campaigns, project types, and billability
Your first calendar event tagged with real client data
Your first Utilization report generated in Google Sheets
Step 1 — Install Time Reports Pro
Open Google Calendar in your browser and visit the TRP listing directly:
workspace.google.com/marketplace/app/time_reports_pro/956232481109
Or search “Time Reports Pro” in the Google Workspace Marketplace.
Click Install and grant the requested permissions
Once installed, TRP will appear as a sidebar panel in Google Calendar
Open the TRP sidebar and select which calendar to configure first
★ Tip: Start with your main client work calendar. You can always connect additional calendars — including team member calendars— after initial setup.
Step 2 — Set Up Your Custom Fields
These fields are specifically designed for agency teams. Together they let you report on time by client, campaign, and work type — which is what you need to have honest conversations about scope, utilization, and profitability.
Once you’re going through the Setup Wizard, you will be prompted to setup custom fields.
(Note: to set this up post setup wizard In TRP: go to Settings → Custom Fields → Add Field. Create each field below in order.)
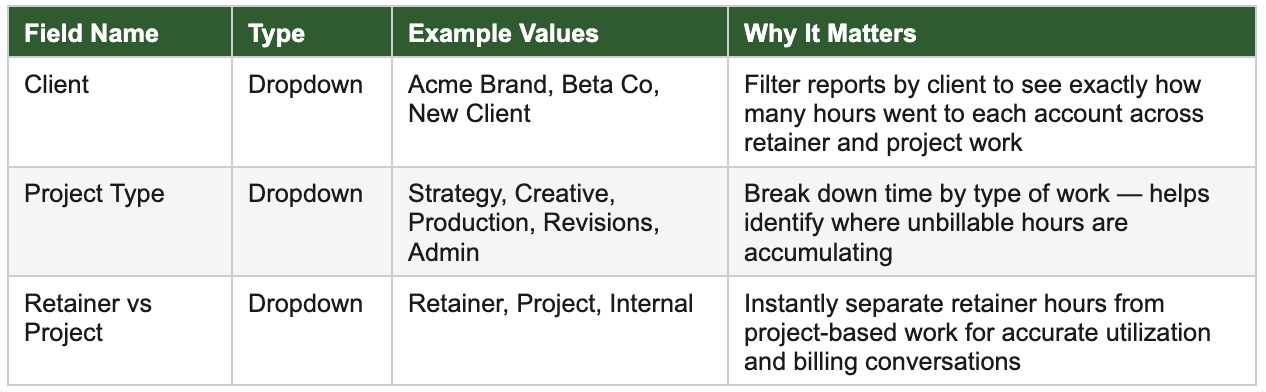
★ Tip: Set up your real client names and active campaign names in the dropdowns from day one. Generic placeholders like ‘Client A’ make reports harder to act on.
Step 3 — Tag Your First Calendar Event
With the TRP sidebar open in Google Calendar:
Click on any existing calendar event — a client call, creative review, or kickoff meeting works well
The TRP sidebar will show your custom fields for that event
Fill in Client, Project Type, and Retainer vs Project
Save the event
Note: YYou don’t need to retag your entire calendar history. Tag recent events going forward — after 2–3 weeks you’ll have enough data for a meaningful first report. The habit is quick once the fields are set up.
★ Tip: Tag at least 5–10 events before running your first report so the output is meaningful.
Step 4 — Run Your First Utilization Report
Every report is generated as a Google Sheet automatically — no exporting, no formatting. Here’s what to run first:

To run your first report:
In TRP, select Report Type: Utilization Report
Set your date range — last 30 days is a good starting point
Under Fields, select the fields you want to report on such as: Client, Project Type, Retainer vs Project
Select the calendar you configured in Step 1
Click Generate Report — TRP will create a Google Sheet in your Drive automatically
★ Tip: Once you’re comfortable with the basics, try running a second report filtered by Campaign to see which campaigns are consuming the most unbillable time. That’s usually where the scope conversation starts.
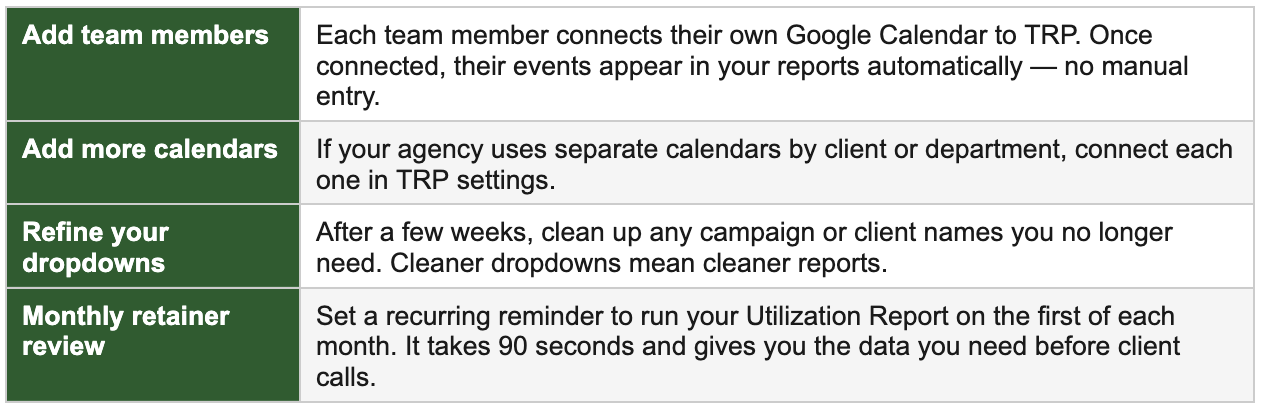
What’s Next
Once your first report is live, here’s how most teams build on it:
Questions about your setup?
Reply to our email and we’ll help you configure TRP specifically for your team.